Callas: planting and care, growing in the garden and at home
 The plant calla (lat. Calla), or zantedeschia, is a genus of perennial plants of the family Araceae or arum family. Calla flower grows in damp areas in South America and Africa, from Nigeria to Tanzania. It is a relative of such plant as arum lily, or water lily, that is the only representative of its genus, the geographic range of which is located in the Northern Hemisphere. Zantedeschia is sometimes named as arum lily, or calla lily. The flower received the name “zantedeschia” from the German botanist Kurt Sprengel, who named it in honor of his friend, the Italian botanist Giovanni Zantedeschi, but zantedeschia is still called simply “calla”.
This plant attracts flower growers not only by its very large showy leaves and flowers of an unusual form, but also by the fact that you can grow calla in the garden, at home, in a pot.
The peculiarities of calla flower
Growing of calla, like of any other plant, implies the following the rules of farming. The main peculiarity of this flower is that it can be grown either in the yards as garden calla, or in the flats as potted houseplant calla. But the general rules of cultivation and care for callas, wherever they are grown, are as follows:
- calla requires a shallow planting, i.e. rhizomes are barely sprinkled with the soil to avoid root rotting;
- what novice gardeners mistakenly call “calla flower” is actually the spathe that encloses the flower cluster. In fact, the calla flowers are small and plain, but very fragrant;
- after planting, calla does not sprout until a root system has been formed. So do not worry, if during the month there will be no seedlings;
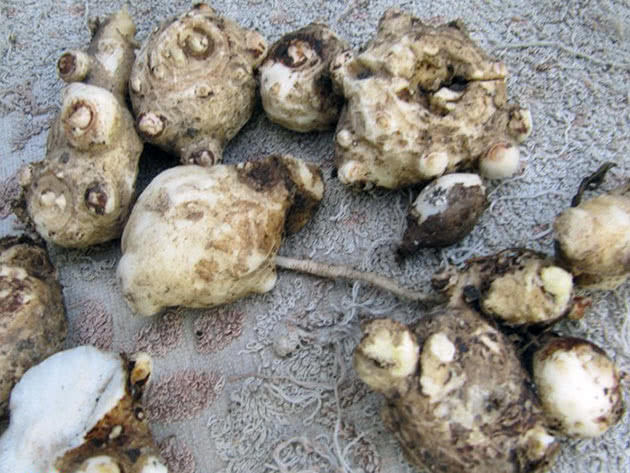
- while digging up the tubers, be careful: they are easily damaged;
- calla is an alive barometer: water droplets like tears appear on its spathe and the tips of the leaves before the rain;
- the pot for calla, especially for arum lily, should be porous for excess moisture to evaporate away. In addition, arum lily likes privacy and does not tolerate any neighbors in its pot;
- each calla flower blooms for about a month;
- from time to time the topsoil in the pot with callas should be carefully removed, trying not to damage the roots, and replaced with a fresh nutrient substrate.
Species and varieties of calla
In the genus there are only eight species of calla, but in culture, only three of them are grown and they were used by plant breeders as a material for breeding new varieties:
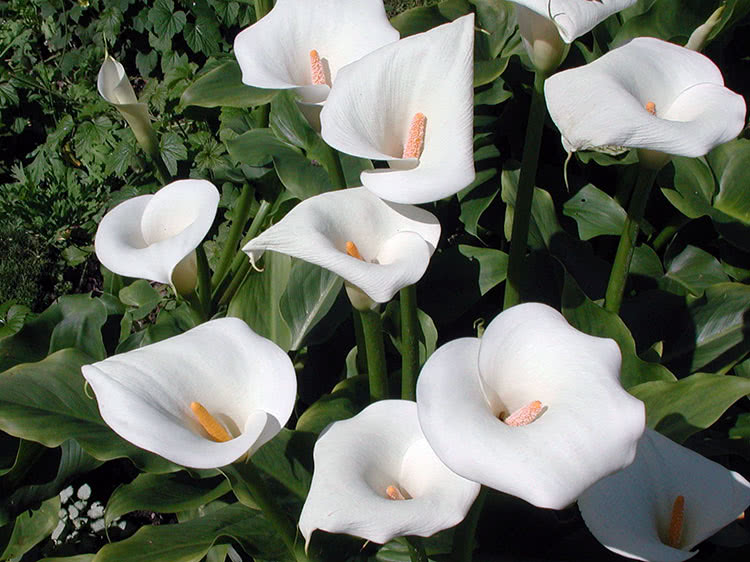
Arum lily (Calla aethiopica)
it is a tall white calla (flower stalks are up to 40 inches or more in height), the underground part is a rhizome, not a bulb, as other species have. Arum lily is a water-loving plant, it does not droop off its large shiny green leaves even during a dormant period. The most popular varieties are:
- Nicolai: the length of flower stalk is up to 60 inches. It has dark green, arrow-shaped leaves, petioles are long. The both sides of spathe are green, the outside diameter is 3-5 inches;
- Gem is a dwarf-growing variety 20 inches in height. It is suitable for growing in pots;
- Schone Zweibruckerin is a variety the flowerstalk of which is 40 inches in length, the leaves are heart-shaped, bright, the underside of the spathe is dark green, the diameter of the upper side is 4-6 inches;
- Green Goddess is a rare majestic green calla reaching a height of 35 inches.

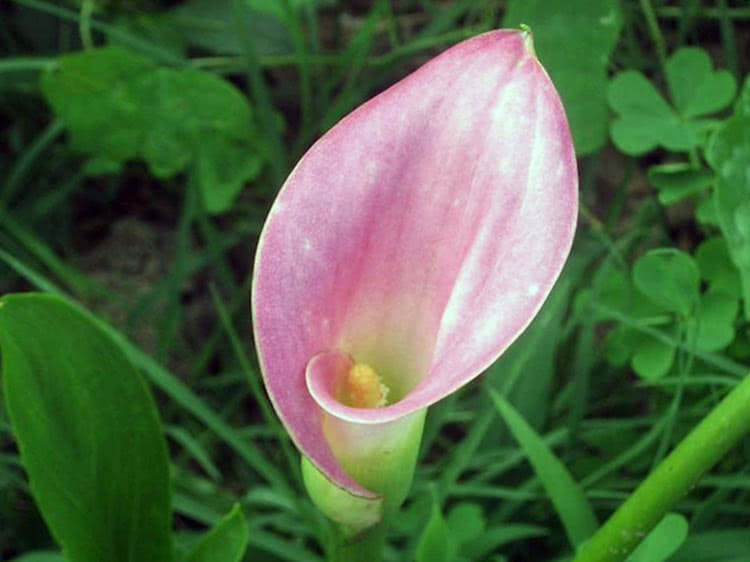
Pink arum lily (Calla rehmannii)
– is a short cala (up to 28 inches in height) with a pink spathe ( purple-burgundy or red-pink) and narrow green leaves. The underground part of the plant is a tuber similar to a tuber of begonia or gloxinia. In autumn the plant droops off the leaves and requires a rest during the winter. Popular varieties are:
- Chameleon is a low calla that can be grown both in the pot and in the garden. The spathe is of a peach color with golden tints;
- Evening is a satin black and purple calla;
- Indian Summer is a garnet red calla.

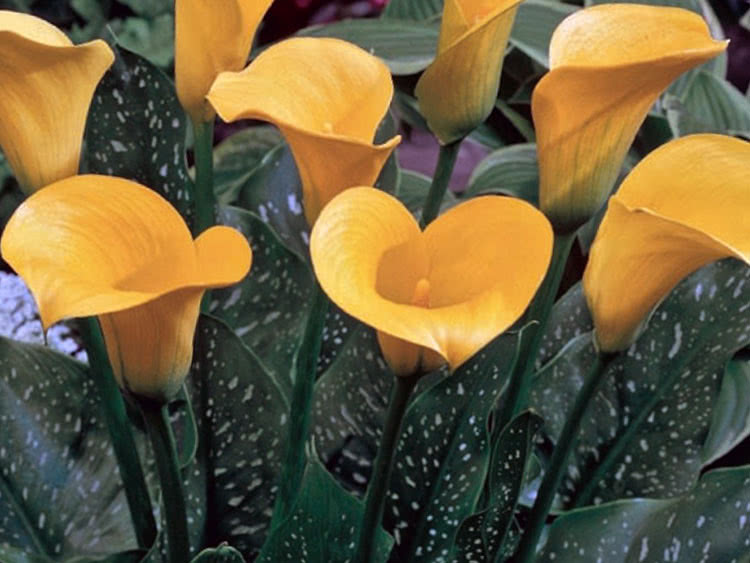
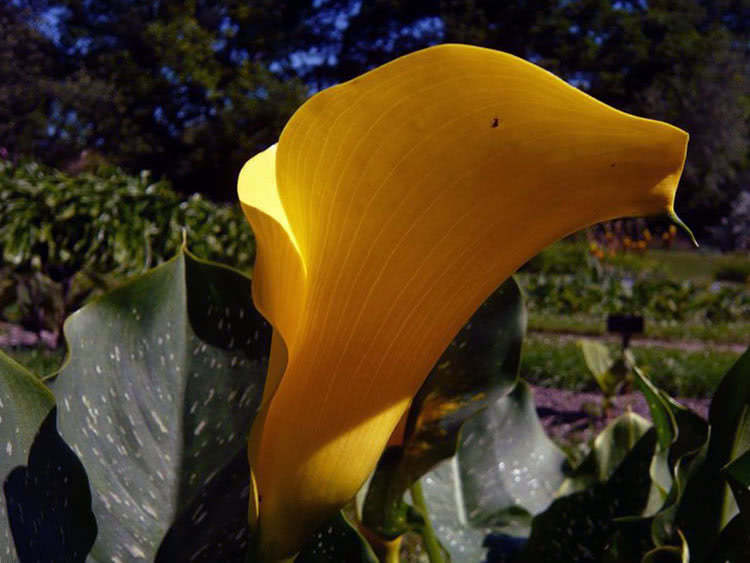
Golden calla lily (Calla elliottiana)
is a calla with large green speckled heart-shaped leaves. The spathe is yellow-green outside, and it is yellow inside. It reaches 20 inches in height. The varieties are:
- Yellow corner is a plant with sunny yellow spathe, large succulent green leaves are speckled with light yellow spots.
- Vermeer has a slightly wavy spathe that is marble-white outside and inside it is lilac-cherry turning into a deep dark purple color, the leaves are dark green with white specks;
- Black-eyed beauty has a spathe that is of creamy butter color with a light lemon tint, and the leaves are spotted like the leaves of other varieties of this species.
Other species of calla that grow in nature are spotted arum lily (Calla albomaculata), magapule (Calla jucunda), calla odorata, mapoch lily (Calla pentlandii), calla valida.
Growing of garden calla
Many gardeners grow callas with a great pleasure to decorate their gardens. The sites where callas grow look like Arabic ornamental painting: rhizomes give the young shoots of leaves each year, and there are elegant arrows of flower stalks among rich foliage.

Calla prefers spacious sites and fertile soil, but it is advisable to shade them in the hottest afternoon hours: the full sun makes the leaves wither, burns and dries them out, so it is important to plant calla near bushes or trees that will protect calla in the afternoon. The soil should be acidic, or at least weakly acidic. Also it requires a good drainage, because stagnation of water in the roots is fatal to the plant. The optimal composition of the soil for callas is soil, sand, peat and leaf humus in equal proportions.
Planting of calla and care in the garden
Planting of calla in spring
Calla is planted in early May. Before planting, the seeding material is soaked in a solution of potassium permanganate for half an hour, then you should carefully inspect it and, if necessary, cut out the rotten places to have only healthy tissue and treat the sore with brilliant green. Apply a combined mineral fertilizer at the rate of 1-1.4 oz per 11 ft² and dig over the site. Then the tubers are immersed into the prepared planting hole to a depth of 2- 4 inches at a distance of 12-16 inches from each other (depending on the size of the bulbs), buried, and then the planting site is well watered. You should note that calla has a peculiarity: it does not sprout until it has formed the underground part, so if you are lucky, you will see the sprouts in two weeks, and if you're not lucky enough, the sprouts will appear in a month. Do not despair and do not try to dig the hole up and see at what stage the process is. The first two weeks calla is not watered as watering after planting will be enough.

There is a way to get calla prepared for planting in the open ground: at the end of March or in early April plant calla tubers in small pots at a depth of 0.8-1 inch in a special soil for seedlings or in the soil that was tempered in the oven for forty minutes. Water them 1-2 times a week, and a week before transplanting open the window for a short period of time for getting the plants adapted for outside temperature. Transplanting of calla in the open ground is carried out along with a clod of soil.
Planting of calla in autumn
Planting of calla in autumn is not carried out.
Care for calla in the garden
How to care for calla? It is very easy. All that calla needs for its normal growth is watering followed by loosening. The plant needs moderate but regular watering with increasing the amount of water in a hot, dry summer. After each watering you should slightly loosen the soil around the plants. If you have already applied combined fertilizer before planting, no further dressing of calla is needed. Only if the soil at the site with calla is not acidic enough, pour it with water acidified with citric acid or vinegar.
Calla at home
Forcing treatment of calla at home
Indoor calla is grown at the temperature of 72-77 ºF in the summer and in the winter the temperature should not be below 57 °F. Location for the plant should be well lit but protected from the afternoon sun and drafts. The soil acidity for home callas should be around 6-6.5 pH. It would be better to add sphagnum moss, peat or sawdust in the nutrient soil. The tuber for forcing calla should be about 2.4 inches in diameter, it is planted with its convex side faced down into the container with a diameter of at least 10 inches, the depth of planting is 2 inches. After planting of tuber, the soil should be processed with a solution of fungicide.
Care for calla at home
Care for calla at home is not more difficult than the care for calla in the garden. The planted tuber needs a moderated watering for the roots not to rot. If you want your calla to flower early with the spathe having the brightest color, then you can do the following: the night temperature is lowered to 61 ºF, and during the day arrange the brightest light, but avoid a direct sunlight. If forcing treatment takes place in the winter time, calla will need supplement lightning of fluorescent lamps for its light day to last for at least 10 hours. Calla is fertilized with a liquid fertilizers. Add fertilizers in the water and apply it with every fifth watering of the plant.

Propagation of calla
Calla can be propagated by seeds (this method is unreliable, besides you will have to wait for the results for a very long time), by tubers and through division of the bush. Propagation of calla through division of the bush is undertaken as follows: in autumn when digging the bush out separate the offspring with a part of rhizome and transplant it in a pot with the soil mixture, and in spring transplant it into open ground. It is only arum lily that is propagated by bush division, the rest of calla varieties are propagated by tubers: the tubers are dug out in autumn, stored all winter, and in spring they are planted in open ground.

Callas after flowering
Care for tuberous calla is different from care for rhizomatous calla. The arum lily, or rhizomatous calla, has a dormant period that starts at the time of summer heat: its growth slows down, then stops, and calla turns yellow... At this time watering should be reduced, and a plant should be transferred on a balcony or in the garden on a well lit place where it will be protected from the rain. In the first half of July, the plant is taken away from the pot, all old leaves and buds are removed, and the plant is repotted into a pot with a new nutrient mixture and put in a light place. Start preparing it for a new flowering season by watering and feeding it. This is the cycle that rhizomatous potted calla has. Garden calla remains on the site until autumn, in September rhizomes are dug out and stored with a clod of soil in dry and cool conditions with a moderate infrequent watering.

After flowering, the spathe of tuberous callas gradually turns green and droops off, the leaves turn yellow and wither. Garden tuberous calla is gently dug out in the third week of September, trying not to damage the tubers while setting them free of soil, washed and kept at a temperature of 41-50 ºF for a couple of weeks for beneficial nutrients to move from the leaves to the tubers. After that dead leaves are easily removed.
Storing of calla in winter
In our latitudes, callas are not left in the soil for the winter. When the leaves wither away, they are removed, tubers are well washed, soaked in a solution of potassium permanganate for 30 minutes, washed again and placed in a dark place to dry. Then the tubers are packed in paper bags and kept at a temperature of 41-45 ºF: in a city flat you can use vegetable drawers in the refrigerator for this purpose.
If you cannot keep calla at a cool place after its digging out, slightly dry out the rhizomes of arum lily and after cutting off the leaves, store it as tubers. Do not forget to check the state of tubers and rhizomes of the calla on a weekly basis: they can dry out and wrinkle because of too hot temperature, or, conversely, start rotting because of moisture.
If you grow calla in the pot, then there is no need to remove it from the pot during a dormant period, and you can just place it on a cool porch or balcony. If you do not let your beauty rest for a couple of months, keep its watering and promote its further growth by all means, your calla can get exhausted and will not bloom.